Mesh and Alpha Issues – A guide/what to look for
Edit: Please read comments by Mel Vanbeeck and Siddean Munro for other important points.
Ok before I start I must point out, this post is in no way a criticism of the hair shown in the post. I have the permission of Kavar Cleanslate of Exile hair to use his hair as an example to show what many of you may have experienced with glitches with alpha sorting with mesh items, whether both items are mesh or only one of the items is mesh.
I used a mesh avatar upper body for this post so that no ones clothing was used, this is not a finger wag at anyone, this is to help those that do not realise what is causing issues, and maybe to help some that did not know, realise that they can fix it.
Many years ago LL introduced PNG uploads,and there was a huge sigh of relief around the grid, because it meant that when making clothing layer clothing, you could forget about doing all the complicated alpha channel work, and just save as an alpha in one step, anything not painted on would save with alpha, and you were done. Many got so used to using/uploading png’s that it became a habit to save them for everything, especially as if there was no ‘visible’ alpha, it was just solid and looked good.
This is not the case, as PNG’s are sneaky, and they are always alpha in the default save settings in Photoshop.
Now with Mesh alpha which is most often used in hair textures, if you wear mesh hair, and you have on clothing that is mesh and has alpha components, then you get this cutout like effect and suddenly you cannot wear one or the other. In some cases there have been customers that have taken this matter up with the hair creator, but there is nothing that the hair creators can actually do because they need alpha in their hair because of wisps and bangs etc.
But if your clothing does not actually need alpha – and really none of it should unless you are trying to alter a model, or trying for a sheer effect – then you need to make sure you are saving your textures in the correct format. The goal is that everyone is able to wear your clothing/Accessories at all times, not have to rethink their other items for it to be wearable.
I took some pictures with not only the different textures on the mesh top, but also showed the textures open so you can see how it is. I also wanted to point out a few things about the mesh UV map surrounding areas.
Because I am using the default avatar in mesh form, I was able to use the default avatar clothing layers. You used to be able to find these on the Second Life website, but now they are located at the Second Life Wiki HERE .
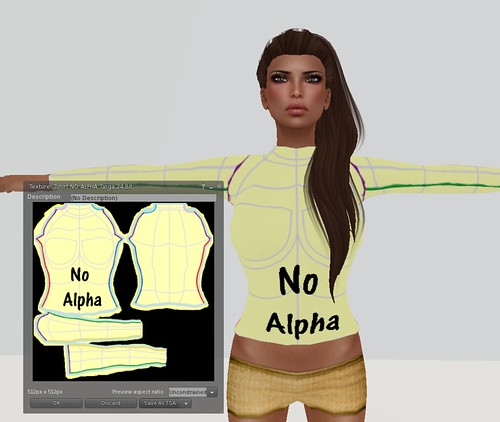
First Pic : No Alpha 24 bit TGA
This first pic is a complete fill of the actual intended print of the item, as well as a pure black fill – on clothing layers the black would have had to have been alpha, but with mesh anything in that area does not show at all. This layer has been saved as a 24 bit Targa, when you chose to save as targa, you get a pop up that has options of 16 bit 24 bit and 32 bit. The 24 bit option is for no alpha channels at all.
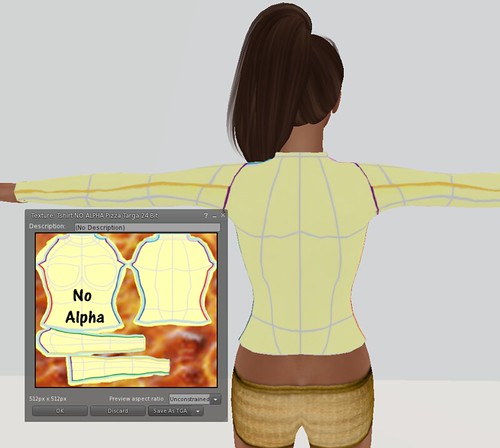
Second Pic : No Alpha 24 bit TGA
Proving that whatever is in the surrounding space doesn’t show, by filling that area with Pizza and showing the other side of the mesh top and the seams areas. This layer has been saved as a 24 bit Targa, when you chose to save as targa, you get a pop up that has options of 16 bit 24 bit and 32 bit. The 24 bit option is for no alpha channels at all.
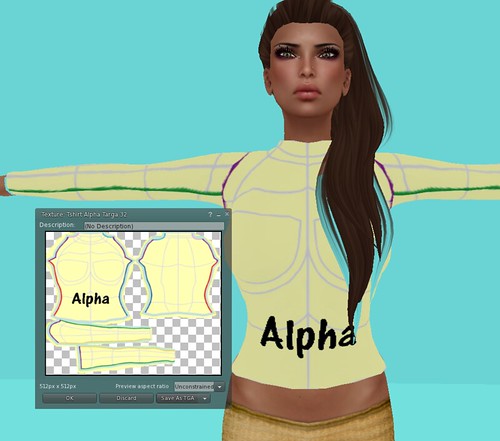
Third Pic : Alpha 32 bit TGA
This picture is showing that the texture was saved as a 32 bit Alpha layer, and that once put on the top as its texture, you can now see the instant alpha sorting glitch, where the hair alpha looks to have cut out the part of the top it lays across. I chose the one sided tail style hair, so that you could see it that it effects only the side the hair is on.
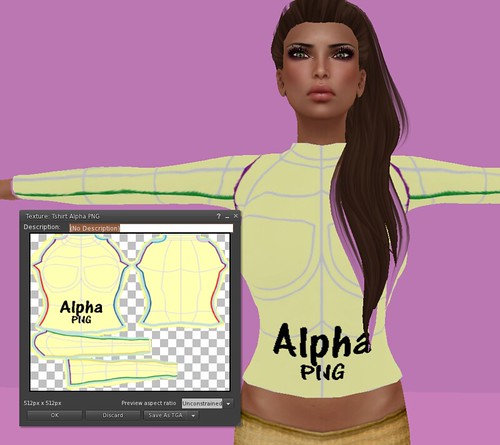
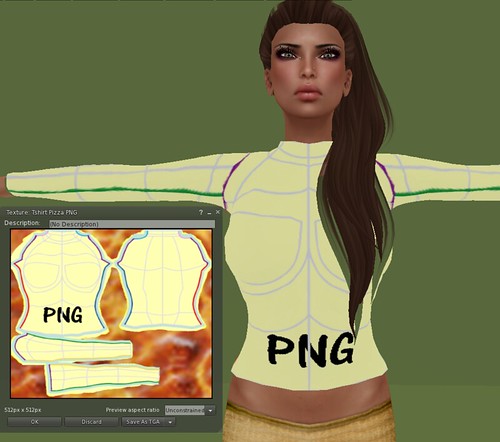
Fourth Pic : Alpha PNG
This picture shows the texture was saved as a PNG and has alpha properties that are visual, so the texture would have been saved as a PNG because the creator wanted those parts to be alpha – which would have been the case for clothing layer clothing, or things such as plants, or cut outs etc.
Fifth Pic : Filled PNG
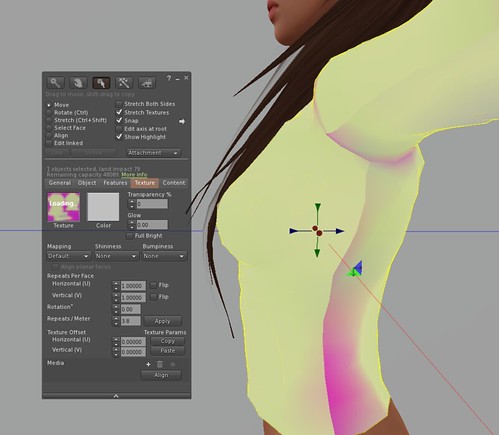
This is where the mistakes may be occurring, with the texture looking as though it is 100% solid, no cut outs, no visible alpha areas on the texture, the texture seems like a regular image. Though once applied to the top you can see that it still causes the part covered with hair to vanish. This will happen to the back of the top too if the hair is long and has alpha wisps etc – again this is not the fault of the hair, this is a mesh alpha issue.
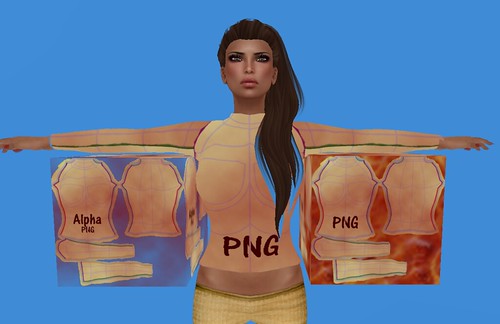
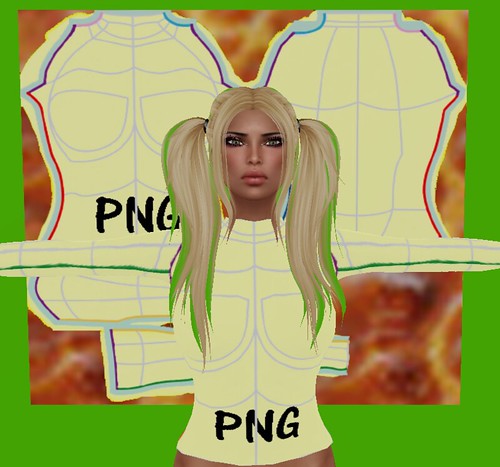
Sixth and Seventh Pics : PNGs side by Side
This picture shows the both PNG textures on boxes side by side, as well as on the top worn. Then using CTRL ALT and T to highlight transparent in world, you can see that the red that indicates there is alpha, shows up on all three items. This is a good way to check your store vendors and see if you have at any time uploaded PNG’s for full filled images. As you can see, if someone is wearing mesh hair and standing around where there are PNG textured Vendors, signs and so on, they will also end up with this effect, which does not make things pleasant, and again could cause the wearer to believe there is an error with the hair.
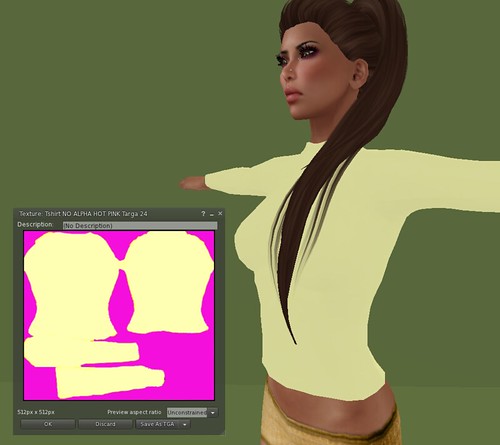
Eighth and Ninth Pic : TGA 24 bit Hot Pink Fill
This picture shows you how mesh appears unrezzed, or not fully rezzed. You may have experienced faint black lines on things you wear, sometimes they look odd because they are not straight lines but more like map trails. These are those fill areas showing through before the seams fully as the texture finishes rezzing. UV maps sometimes are a complex unwrapping process, so wherever the item has been cut open and splayed out so to speak, is where you will see those markings.
This is why I am assuming that some may be using alpha in those fill areas, so that there is no appearance of bleeding while rezzing. The better option, and I have tested this, is to actually use either the colour of the item you are saving the texture as if its a blue top then fill it with the same blue and so one while you save each colour. This way, even though the item may not be fully rezzed there will not be an appearance of weird lines due to the fill being a different colour.
So if you do come across clothing that does this when you wear mesh hair, or other mesh alpha necessary items, then check first to see if there are any sheer attributes to the item, or cut out areas of the design, that may just be done with texture not actual modeling the cut outs. If there appears to be no reason for alpha to be part of the item, contact the creator and let them know that their items are having this issue. They may not know about the alpha sorting, and they may not realise that PNG uploads even if solid contain alpha. I myself have made that mistake in the past, and even mistakenly uploaded a whole store full of vendor ads in 32 bit Targa because I kept hearing my boss saying she had to save targas as 32 bit and i was so new to PS that I thought that was a must for everything.
Also please note, this will not happen with non mesh hair, so if you do own an item of clothing that has this issue, and you just love it to bits, then just wear hair that is either up and out of the way of your clothing, or non mesh while you have it on. But again I suggest letting the creator know in a notecard, as they may be able to fix it.
I hope this helps and thank you to Kavar again for letting me show his hair for this post.
Equipment Used:
VR Studio 3.0 and HUD and Library for location shoots – VR Foundry Mainstore , VR Foundry @ The Deck
Eyes:
Ellis – LeLutka
Lashes:
Natural Curl Sculpted Lashes – LeLutka
Skin Worn:
Shyla – Belleza
Hair:
Bring it On, Catwalk – Exile
Clothes Worn :
Sitari Shorts (part of skirt)- Elymode @ Zodiac/September
137 Comments
Storm Dust
Great post, nice and useful tricks, i’m sure lot of people don’t know about this.
Great thanks !
Pingback:
Pingback:
Ais
Thank you so much for making this post. It helps not only consumers but also creators, because you said there are probably a lot out there doing this simply because they don’t know that there is a better option not because it has a functional reason in their design. Wonderful to see bloggers educating about more than just where to get great fashion.
Sasy Scarborough
thank you so much Aisling ♥
Mel Vanbeeck
Don’t forget that by using a 24 bit image instead of a 32 bit image, you save video memory and render complexity (each channel requires 1MB of video memory in a 1024×1024 image), so you’re helping people’s frame rate. The difference is small, but if you compare an environment filled with 32 bit images with one filled with 24 bit images, I would bet the fps would be noticeably lower with the 32 bit scene.
Sasy Scarborough
I was trying to find your post about that Mel ♥ so didn’t want to quote you without it 🙂 thank you
Siddean Munro
This is a very useful post, thanks for making it Sasy. I would like to add a couple things if I may 🙂
In system layers, it didn’t matter if you used alpha channels in your textures, because the avatar doesn’t behave the same way around other textures with alpha channels, which is why this is never an issue with mesh hair and system layer clothing.
To eliminate the issue of the background colour bleeding through as in the last pic, or when zooming your camera away from the model, you can either fill the background with a solid colour that matches the majority of your texture colour as Sasy mentioned; use Photoshop’s content aware fill (the best method if you have the appropriate version of photoshop); or there is a plugin called Flaming Pear that has an option called Solidify which will fill the selected area in a similar fashion to content aware. That way you can save the file as a 24 bit tga with no fear of background bleed and no problem with alpha channels from hair texture conflicting.
If you wish to use .png format, use the “Save for Web” option under the save menu (photoshop) and remove the transparency option.
If you need parts of your mesh model to be transparent, I would recommend using a separate material zone for the transparent textures, and trying to place the transparent areas where conflict with other things like hair would be minimal.
http://www.flamingpear.com/download.html
Sasy Scarborough
Thank you so much Siddean, Mel mentioned he thought there was a way to save 24 bit PNG’s but was not near a PS at the time…and I could not find info on it that was as clear as you mentioned, so thank you for sharing that information, and the flaming pear is a great one as it does spread the fill area with the same texture really well.Also yes, definitely if the model is your own and you can assign textures to different sections, you have up to 8 materials per model for second life, then use that, as so far most transparency sheer effects I have seen have been at the bottom of items or at least lower than the hair area.