Viewer 2
STOP and Breathe, it really will be ok.
Today marks the day many have been waiting for, Second Life Viewer 2.0 – or whatever version they end up releasing, either way it will start with a 2.
I am really not entirely sure where to start with this post, but I did want to try and help out a little in the understanding of the new viewer.
For me the first place I needed to go was inventory, and this will take some getting used to. But lets try and visit as much as we can, it really is a whole new world.
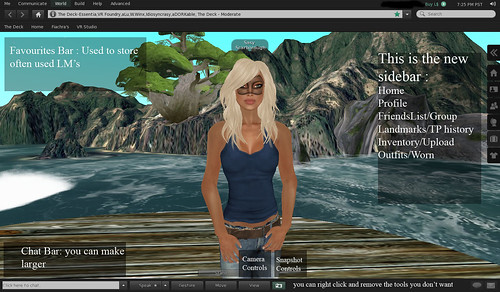
First Picture :
Sidebar:
Home Tab:
This is going to be more useful for New Residents, but also handy to have some of the major website links used for Second Life on hand in your viewer.
* Destination Guide : Listings for Hot Spots and Popular Places around the Grid.
* World Map : An easier reference to the World Map with easy interface.
* My Appearance : This takes you to Appearance Editor – not to be confused with Appearance Mode. With two tabs for My Oufits and Worn – we will go into that in a sec.
* My Dashboard : A short cut in world to your accounts pages on the Main Website. You will still have to sign in, but it will help people get a better understanding of how their account info is handled.
* Quick Start Guide : takes you to the Second Life Wiki Pages.
Profile Tab :
This is everything that your regular profile has. Though things have been moved around and are more in your face than in the past.
You have your Second Life picture at the top, with description beside it as would be your first page on regular profile. Then directly under it is your Real World picture and info, so there is no getting around see the both of those together.
Also includes a ‘homepage’ area for your websites , xstreet page etc…having this easier to access than from previous webtab page.
Partner name is directly under that and is clickable to visit their profile. The one startling thing about this viewer is that profiles are not separate boxes, that means no more minimising a profile to save for a few hours later to shop etc.
It also makes sending multiple people items complicated as you do need to open a second inventory to pull from. If you find that you do not have a picks tab when using Profile, then either right click your body and select my profile that way, or press the save changes button at the bottom of your profile to kick it into place.
People Tab :
*Nearby : Shows all avatars in your immediate area.
* My Friends : Shows your full friends list, broken up into Online and All. The thing to look out for in this is that deleting calling cards CAN remove from Friends List, so be very wary of doing that, even if you have doubles.
* My Groups : Is your full list of groups you are part of. You have the option to click on the info button for a quick highlight where you can leave the group, or you can click the arrow for full info box broken up into drop downs.
* Recent : Recent is a list of people you have been in contact with.
Places Tab :
* My Landmarks :
Favourites Folder – this is the place to store all your most used landmarks, the ones that you put in this folder will appear along the top of your screen as easy access to tp from them without having to go to find them.
My Landmarks – all the landmarks you make or get sent for places you wish to return to or visit.
* Teleport History : LM’s you can reuse to visit places you have visited even if you didn’t make a landmark for it, they are broken up into today, yesterday and so on.
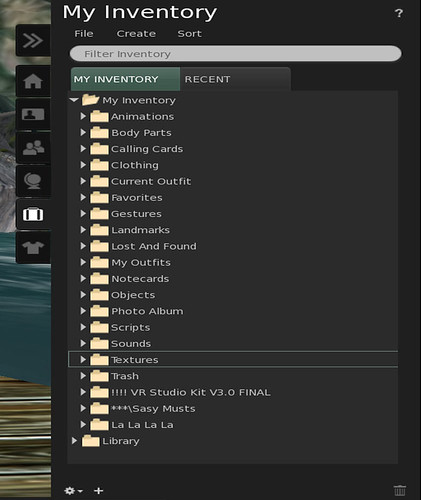
Second Picture :
Inventory Tab :
*My Inventory : New folders are Current Outfit and My Outfits.
**Current Outfit : this is a different take on the worn tab of other viewers. Will show all items of clothing and attachments that you have on your person.
** My Outfits : In thepast if you made an outfit using appearance mode it would ask you what you wished to keep, and then would make copies of those items and throw them in your clothing folder. If the items you were wearing were no copy they would move them to this new folder and you would have a hell of a time trying to get them back to where they belonged.
NO MORE DRAMA …this is one of the most awesome NEW features of this Viewer.
Items that are gathered in the My Outfit folder now LINK to their originals, so that means if you make an outfit of mix and match items, and through out the look are a few pieces that are NO COPY, it will not matter, you do not have to worry, because none of the items actually move from their original place.
All the items that are in the My Outfits folders are just Links that you can click on to zoom your mouse to the original folder. Just like an imbedded link in a website, so now you can make as many looks as you like and not effect your inventory count, or your permissions at all.
This system is perfect for Models, Fashion bloggers and Business owners wanting to put together looks for vendor ads etc, and just everyone that likes to organise their inventory in a way that is a complete fashion look you have loved so much but never wanted to move your favourite belt from its original location in case you can’t find it for another outfit.
* Recent Tab : This shows all items that have come to you, or been changed since your last log in, that may vary due to your filters, but it isn’t much different than the regular viewer recent tab.
IMPORTANT : The dropdowns at the top of your Inventory are relatively the same with ONE MAJOR Exception.
UPLOAD has now moved to Inventory folder. All your upload functions are now in this area, so if you want to bring a picture, sound file, animation into world you will have to do it from the FILE menu in inventory.
My Appearance Tab :
* My Outfits : as already mentioned above , the folder also has a tab function of its own.
*Wearing : is the tab similar to current, showing you all the items you have on your person or hud attachments. Again these are just links to the originals.
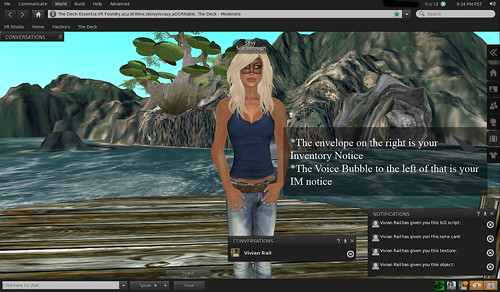
Third Picture :
Notices, IM’s and Teleports:
The way we are used to receiving notices, and items is a thing of the past with this viewer and many of you will struggle with it. It will take practice but for many that hated the whole blue dropdowns way that interrupted building etc, this will be ideal.
On the far right at the bottom you will see an envelope and a voice bubble icon. These are your indicators of incoming items, notices, and IM’s.
This can be daunting because of the fear of losing something sent, but practice makes perfect.
To recieve an item you need to click the envelope and then click on the box/window that comes up. This will give you anything sent.
In the case of notices from groups, you will need to double left click the notice to get any LM’s or notecards.
If objects are sent a box will appear on the left of those icons, again clicking on them will give you the option to accept them. My problems with this have been that you may not see them for a very long time, as a drop down is a lot more noticeable. The IMs do make a noise.
Teleports also hide down there, so if someone sends you one hopefully they will let you know lol.
Notice also that an image appears showing you who is IMing you before you open it. So if you are familiar with the profile pics of close friends etc, you will know straight away.
Chat Bar and IM:
The far left chat bar is difficult for me personally to deal with, but there is a fix for that.
If you go to your Viewer folder on your hard drive and then click on the Skins folder, then the Default folder, then the XUI folder, then the EN Folder and find the XML file called panel_nearby_chat_bar.xml right click and open it with notepad and then increase the value of max_width - I changed mine to 1500 (thank you Psi)
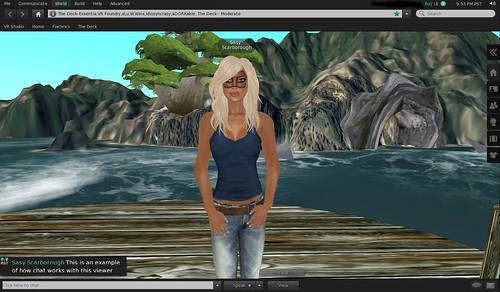
Fourth Picture:
I have come back after a relog to show you the larger chat bar, but also an example of how chat appears now also, every single thing you type will not include your profile pic, including IM’s and GROUP CHAT. Chat also stacks together if you keep writing and enter without someone putting text in between.
Now for what you have all been waiting. Have you noticed my clue yet ? those of you who know skins well will have noticed by now I would imagine. It is what many of us older residents have been begging for for years, and it is finally one of TWO new features for Second Life avatars.
I guess having the pic up means you probably didn’t read a word I just said lol. But yes it is finally here, Tattoo layers on all the mesh.
Just so you knew I wasn’t playing tricks on you, here it is on the head portion of the mesh. I made this masque a year or so ago for an event on an Eloh mod I did. I was so happy that I still had it in layers form to show you how wonderful this new feature will be.
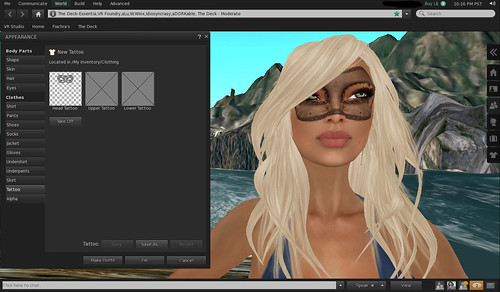
Fifth Picture :
Tattoo Layers :I can just imagine I lost everyone then, this ability is going to open a whole new world in design, not only the possibility of tattoos, but make up options for skin makers to do as seperates, or even other creators to do as collabs or solo. The Costume and Fetish industry have been long awaiting the ability to hood the head so to speak. That is possible now as you will be able to wear these over your favourite skin, not buy something that comes on a skin layer with a mod, or someone elses skin style.
The other incredible new feature, and again this is going to do a whole lot for the RP and lifestyle avatars.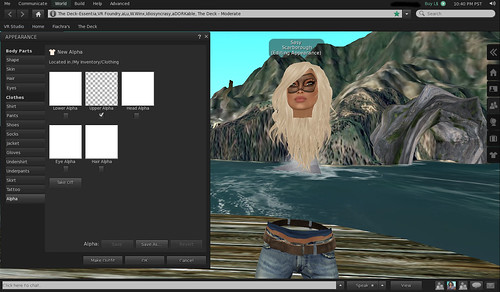
Sixth Picture :
Alpha layers: again a much sought after item, allowing for no more scripts and animations to shrink down a mesh body inside of a prim avatar. I personally love this, because I always get all freaked out when Fia lags and his body inside of his dragon avatar is all stretched and mishapen, makes me sad he looks hurt.
Not only will this help creators of RP and Prim avatars, but it will also mean with some Photoshop practice that you will be able to manipulate the regular mesh for your own designs…yes people
NO MORE INVISIPRIMS …
once this is mastered shoe creators will be able to make an alpha layer that only covers the deformed mesh of the feet, or completely hides the foot, so that there is no need to have an invisi prim at all ruining pictures or making your leg disappear when you sit and so on.
There are so many more things you will have to navigate around with this viewer, it is daunting, and scary. But if you persevere you will open up many new challenges to yourself, and you could have some amazing fun with it. I mean Imagine hair fair this year as someone with full alpha travels through the fair, no prims needed because no one can see you anyway .
Mwahahahahahaha.
xox Sasy Scarborough xox